
티스토리 뷰
앞에서 만들었던 html 파일에 css적용 ×4개 이상.
선택자로 각 영역을 지정하여 바꾸기.
글자 색, 배경색, 버튼의 넓이, 높이, 글자 폰트. 등등 적용.
<html>
    <head>
        <title>Site</title>
        <meta charset="utf-8">
        <style>


            *{ margin:0; padding: 0;}
            body{background-color: #F5F6F7;}
            div{margin-top: 60px;margin-left: 38%;}
            ul,li{ list-style: none;}
           li{margin-bottom: 20px; text-align: left;}
            .box{width: 450px; height: 50px; border: 1px solid #666; padding: 10px;}
            .pbox{width: 120px; height: 50px; border: 1px solid #666; padding: 10px;}
            .necessary{font-size: small; color:red;}
            button{background:#00C850; color:white; width: 450px; border: 1px solid #666; height:50px; font-size: x-large; }


           /*
            선택자{}  선택자로 정리하는법.
           패딩 마진 폰트사이즈 폰트, 크기 넓이
            *
            ul{
                width:100%;
            }


            text-align: center;
            }
            div{width: 400px;}
            button{background: chocolate; color: mediumblue; width: 300px; border: 1px solid #666; height:50px;}
            span{ background: rgb(200, 255, 0);
                display:inline-block;
                width: 150px;


            }*/
        </style>


    </head>
    <body>
        <div>
            <ul>
                <li><span >아이디 </span><br><input type = "text" placeholder = "아이디를 입력하세요" class = 'box'/></li>
                <li><span '>패스워드 </span><br><input type = "password" placeholder = "패스워드를 입력하세요" class = 'box'/>
                    <br><span class = 'necessary' >필수 정보입니다.</span></li>
                <li><span >패스워드 확인 </span><br><input type = "password" placeholder = "다시 패스워드를 입력하세요" class = 'box' />
                    <br><span class = 'necessary' >필수 정보입니다.</span></li>
                <li><span >생년월일</span><br><input type = "date" placeholder = "생년월일을 입력하세요." class = 'box'/>
                    <br><span class = 'necessary' >태어난 년도 4자리를 정확하게 입력하세요.</span></li>
                <li><span >전화번호</span><br> <input type = "text" class = 'pbox' /> - <input type = "text" class = 'pbox' maxlength="4" /> - <input type = "text" class = 'pbox' maxlength="4" />
                    <br><span class = 'necessary' >필수 정보입니다.</span></li>
                <li><span >성별</span><br> 남자<input type ="radio" name="gender"/>  여자<input type="radio" name="gender" /> </li>
                <li><span >취미생활</span><br><input type="checkbox" />독서<input type="checkbox"/>산책<input type="checkbox"/>TV시청 </li>
                <li><button>가입하기</button></li>
        </ul>
        </div>
    </body>
</html>
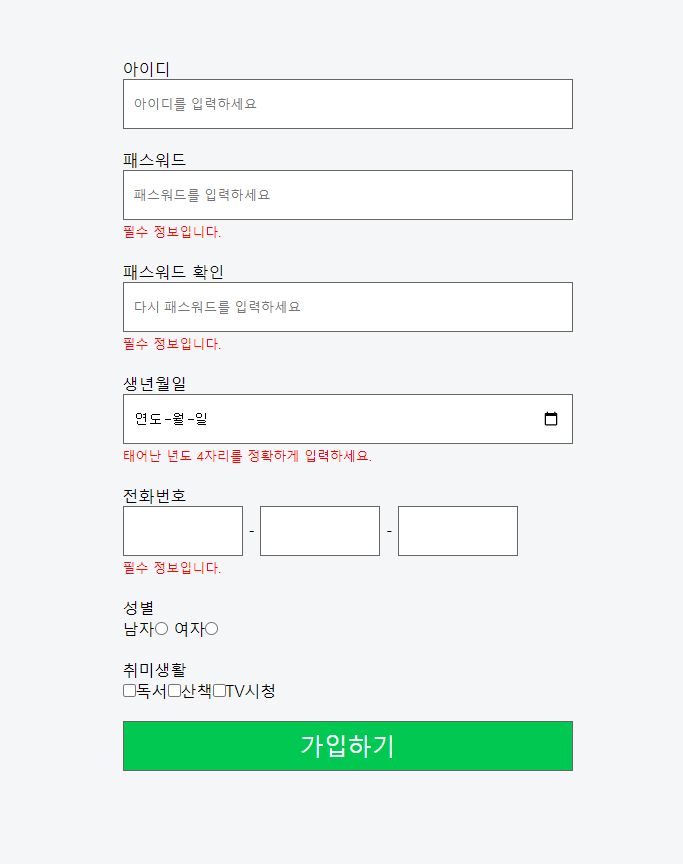
네이버 가입화면을 따라 하려고 노력했다.
body{background-color: #F5F6F7;}
→ 바탕의 색을 네이버 가입 화면 색과 동일하게 지정해주었다.
div{margin-top: 60px;margin-left: 38%;}
margin-top: 60px; →위쪽에 간격을 좀 주기 위해 margin-top 속성을 활용,
margin-left: 38%; →가운데로 정렬하고 싶었는데 text align: center 같은 거를 쓰니 아이디, 패스워드 같은 text도 전부 가운데로 정렬되어 이렇게 했다.
ul,li{ list-style: none;}
→ ul li의 기본값으로 생성되는 점을 없애는 명령
li{margin-bottom: 20px; text-align: left;}
margin-bottom: 20px; →각 요소 사이의 상하 간격을 20px 주었다. 이걸 안 하면 각 요소들이 붙어있어 답답해 보인다.
text-align: left; → 왼쪽으로 정렬해주었다.
.box{width: 450px; height: 50px; border: 1px solid #666; padding: 10px;}
→ 아이디, 비밀번호, 비밀번호 확인, 생년월일에 사용하는 박스를 box class로 지정하고 크기를 450 × 50 px로 정해주었다.
클래스생성자를 사용할 때는 클래스명 앞에 점(.)을 붙여주고 속성과 속성 값을 정해주면 된다.
border는 어떤 상자의 테두리, 경계선을 의미한다. solid는 실선을 나타낸다.
border{ 선종류 선두께 선색깔;}
padding은 상자 안에 담기는 내용과 경계선 사이의 간격을 의미한다.
margin은 경계선과 외부 요소 사이의 간격을 의미한다.
.pbox{width: 120px; height: 50px; border: 1px solid #666; padding: 10px;}
내용은 위와 같다. 위에는 한 개의 박스가 들어가지만 전화번호는 3개의 박스가 들어가야 해서 너비를 줄여주었다.
.necessary{font-size: small; color:red;}
빨간색으로 작은 글씨로 필수적으로 적어야 하는 것을 알리기 위해 만들어봤다.
button{background:#00C850; color:white; width: 450px; border: 1px solid #666; height:50px; font-size: x-large; }
가입하기 버튼의 바탕색과 글씨 색, 경계선, 높이, 폰트 사이즈를 지정했다.
???) 정렬 방법. 이미지 삽입(비밀번호 박스에 자물쇠 이미지와 비밀번호의 보안강도에 따라 색이 변하는 기능.) HTML 코드 예쁘게 쓰는 법
'HTML_CSS' 카테고리의 다른 글
| HTML / CSS - 5 (2021.03.10) (0) | 2021.03.10 |
|---|---|
| HTML / CSS - 4 (2021.03.09) (0) | 2021.03.10 |
| HTML/CSS -3 (2021.03.08) (0) | 2021.03.08 |
| HTML - 2 (2021.03.05) (0) | 2021.03.05 |
| HTML - 1 (2021.03.05) (0) | 2021.03.05 |
- Total
- Today
- Yesterday
- 로드나인
- 은둔청년체험
- 다이나밍프로그래밍
- 롱베케이션
- 서버개발
- 투포인터
- 동적프로그래밍
- 면접비
- 서버점검
- DB 생성
- node.js
- MySQL
- 투포인터 연습
- 면접질문
- MOD
- 최소공통조상
- create databases;
- BFS
- 개발자면접
- 그래프
- 다이나믹프로그래밍
- create db
| 일 | 월 | 화 | 수 | 목 | 금 | 토 |
|---|---|---|---|---|---|---|
| 1 | ||||||
| 2 | 3 | 4 | 5 | 6 | 7 | 8 |
| 9 | 10 | 11 | 12 | 13 | 14 | 15 |
| 16 | 17 | 18 | 19 | 20 | 21 | 22 |
| 23 | 24 | 25 | 26 | 27 | 28 |